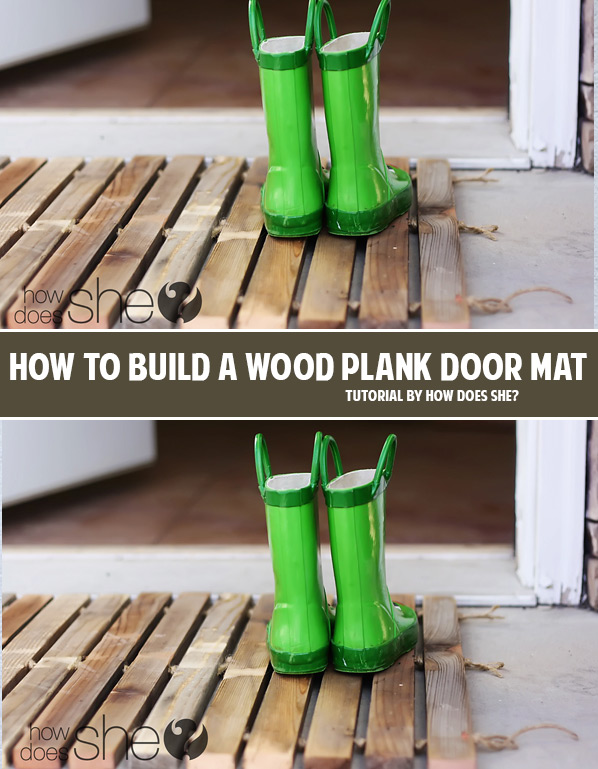
Why not make a DIY wooden doormat? It’s not just pretty, it’s also useful and strong. The grains and colors in the wood make it look unique. Make a custom doormat in no time! I have 10 ideas for a DIY wood plank doormat and instructions for making my favorite. Place it on your front porch to greet your guests!
The Aesthetic Appeal of Wood
Wood looks great. Its natural look and feel give it a warm and welcoming touch. Imagine a doormat made of wooden planks with different grains and colors. It’s not just for cleaning shoes, but also a great way to greet guests.
Durability and Longevity: Making Wood an Ideal Choice
Wood is tough. It can handle a lot of foot traffic and rough weather. A doormat made of wooden planks will last a long time. It’s not a short-term choice, it’s a long-term one.
The Environmental Impact: Sustainable and Recyclable
Wood is good for our planet. It’s renewable and can be recycled. By choosing a wooden doormat, you’re saying no to plastic and yes to a greener earth.
Getting Started: What You’ll Need
Let’s get ready to make your DIY wood plank doormat. Here’s what you need.
Choosing the Right Wood: The Different Types and Their Advantages
Different types of wood have different benefits. Oak is strong, teak lasts a long time, and pine is affordable. Choose the type of wood that suits your style and your area’s weather.
Essential Tools for Your DIY Project
To make your doormat, you need some tools. You’ll need a good saw, a hammer, and some sandpaper. For perfect cuts and a nice finish, you’ll also need a set square and a wood finish. Each tool has a role in making your doormat.
Safety Gear: Protecting Yourself During the Process
Don’t forget to protect yourself. Always wear safety goggles, work gloves, and a dust mask. It’s important to be safe while working.
The Art of Wood Selection: Picking the Perfect Planks
Choosing the right planks is a careful task. You have to think about how they look and how they’ll last.
Understanding Wood Grains and Colors
Look at the grains and colors in the wood. They tell a story about the tree and make each plank unique. Colors can vary from light to dark, each giving a different look. Understanding these can help you make a beautiful doormat.
The Importance of Size and Thickness
Choose the right size and thickness for your planks. If they’re too thin, they might not be strong enough. If they’re too wide, they might look too big. Choose sizes that look good and will last.
Where to Buy Your Wood: Local Shops Vs Online Stores
Ready to buy your wood? You can buy from a local lumber store, a chain like Home Depot or Lowes, or an online store. Local shops let you look at the wood before buying. Online stores are easy and have lots of options. Choose what works best for you.
9 Ways To Make A Wooden Plank Doormat
- Simple Slatted Doormat Connected By Rope. See DIY wood plank doormat instructions below.
- Slatted Horizontal Doormat. This involves using several wood planks of the same length arranged horizontally, with cross braces attached underneath for stability.
- Slatted Vertical Doormat. Similar to the horizontal version, this design aligns the planks vertically. This slight change in orientation can drastically alter the doormat’s look.
- Chevron Patterned Doormat. This more complex design involves cutting the wood planks at an angle and arranging them in a repeating “V” pattern. It’s a visually striking choice for those looking for something different.
- Mosaic Doormat. For a truly unique doormat, cut your wood planks into a variety of shapes and arrange them in a mosaic pattern. This method requires more planning and precision, but the end result is sure to impress.
- Mixed Wood Doormat. Combine different types of wood to create a visually appealing doormat with a variety of colors and textures.
- Rounded Doormat. Instead of keeping the planks straight, round the edges for a softer, more organic look. This can be done either with a router or a power sander.
- Reclaimed Wood Doormat. Use reclaimed wood from pallets or old furniture for a rustic, vintage-style doormat. It’s a fantastic way to recycle while creating something useful and beautiful.
- Inset Doormat. Create a frame with thicker pieces of wood, and arrange thinner, smaller pieces inside. This “inset” design can add depth and dimension to your doormat.
- Interlocking Doormat. For a more modern look, cut your wood into different geometric shapes and interlock them together. This design requires precise cutting, but it creates a visually striking and modern doormat.
Remember, whatever design you choose, adding finishes, paints, or personal touches can make your doormat unique and add to its longevity. Happy crafting!
Want to skip the DIY project? These are some of my favorite wood plank doormats you can buy.
Supplies Needed To Make a Simple DIY Wooden Slat Doormat
Embrace your DIY spirit with this simple yet attractive wooden slat doormat connected with rope. No need for wood glue, nails or a nail gun! This project is easy enough you could have kids assist you with the assembly. For this endeavor, your supply checklist should include:
- Wood Planks: Choose a resilient, weather-friendly wood such as cedar boards or teak.
- Rope: Opt for a durable, weather-resistant rope like nylon or polyester.
- Saw: A power saw, miter saw or handsaw will help achieve precise cuts.
- Drill with Large Drill Bit: To drill holes for the rope. You can use a drill with a cord or cordless.
- Sandpaper: To smooth out the wood surfaces. Choose two grits of sandpaper for best results. Use a high grit sandpaper to begin and end with a fine grit sandpaper to make smooth.
- Wood Sealant or Outdoor Paint: To protect your doormat from weather damage. You will also need paint brushes, a rag or a foam brush to apply.
- Pencil: Use a pencil to mark your planks before cutting.
- Measuring Tape: Measure your planks before cutting into short pieces.
Step-by-Step Guide to Making a Wooden Slat Doormat
- Design Your Doormat: Plan your entrance doormat’s size and layout. Remember to leave enough space between each plank for the rope.
- Cut the Wood: Trim your planks to the planned length.
- Drill the Holes: Drill holes at each end of the planks, big enough for the rope to thread through.
- Sand Your Pieces: Sand all surfaces and edges to ensure a smooth finish.
- Thread the Rope: Run your rope through the drilled holes, tying knots at each end to hold the planks in place. For variation, you could use small wood beads between planks as well. If using synthetic rope you can burn the end of the rope to seal, if desired.
- Apply Finish: Apply a sealant or outdoor paint to protect your creation from the elements.
Tips and Tricks for Making A Wooden Slat Doormat
To make your DIY journey enjoyable and rewarding, keep in mind these helpful tips:
- Perfect Plan: Start with a good plan, complete with precise measurements.
- Smooth Sailing: Don’t skip sanding; it’s vital for the longevity and safety of your doormat.
- Rope Rule: Ensure your rope is weather-resistant, durable, and thick enough to hold the planks securely.
- Creative Corner: Personalize your doormat with stenciled letters, colored ropes, or by painting the planks in different shades.
With these tips and steps, you’re all set to create a unique, stylish, and durable wooden slat doormat. Let the crafting begin!
Frequently Asked Questions (FAQs)
Opt for a durable, weather-resistant rope like nylon or polyester.
Yes, you can stain the planks to enhance their natural color. Make sure to let them dry completely before assembly.
Yes, but keep in mind it might require more detailed cuts and careful assembly to maintain the circular shape.
Simple DIY Wood Plank and Rope Doormat
Equipment
- Saw Use a power saw or handsaw for sharp, accurate cuts.
- Drill with a Large Bit Necessary to create holes for threading the rope.
Materials
- Wood Planks Opt for sturdy, weather-resistant varieties like cedar or teak.
- Rope Choose a robust, weather-proof material such as nylon or polyester.
- Wood Sealant or Outdoor Paint Crucial for shielding your doormat from weather elements.
- Sandpaper Essential for creating smooth, splinter-free wood surfaces.
Instructions
- Designing Your Doormat: Decide on your doormat's dimensions and design. Keep sufficient space between each plank for the rope.
- Trimming the Wood: Cut your planks according to your predetermined measurements.
- Making the Holes: Use a drill to make holes on either end of the planks that are large enough for your chosen rope to pass through.
- Smoothing Your Pieces: Use sandpaper on all surfaces and edges for a smooth, polished finish.
- Stringing the Rope: Thread your rope through the drilled holes, securing each end with a knot to hold the planks in place.
- Finishing Off: Protect your DIY masterpiece from the elements by applying a wood sealant or outdoor paint.
Notes
- Perfect Plan: Start with a good plan, complete with precise measurements.
- Smooth Sailing: Don’t skip sanding; it’s vital for the longevity and safety of your doormat.
- Rope Rule: Ensure your rope is weather-resistant, durable, and thick enough to hold the planks securely.
- Creative Corner: Personalize your doormat with stenciled letters, colored ropes, or by painting the planks in different shades.

Need a visual tutorial? This easy tutorial by How Does She?
