Plastic chairs are versatile and durable, but they don’t always match our desired aesthetic. Thankfully, painting a plastic chair or other plastic furniture is a fantastic way to give it a fresh and personalized look. In this comprehensive guide for how to paint a plastic chair, we’ll walk you through each step of the process, from preparing the chair to adding finishing touches and ensuring long-term durability. By following this guide, you’ll be able to transform your plain plastic chair into a stunning and personalized piece of furniture. If you love how a little paint transforms, try this Easy Painted Dot Duvet DIY or 20 DIY Painted Pots. So, let’s dive in and unleash your creativity for a refreshed and vibrant seating experience!
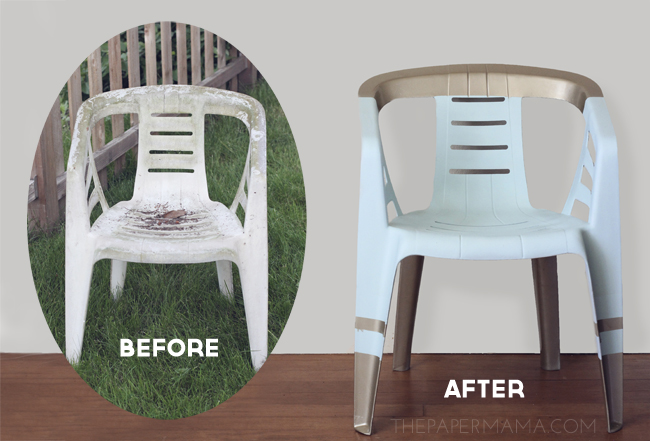
Wow! What a difference! Use some painters tape and spray paint for plastic to get this gorgeous revamped plastic chair. Follow the tutorial by The Paper Mama to learn how to spray paint this plastic chair and turn it into a piece you’ll love!
Preparing Your Plastic Chair for Painting
Before diving into the painting process of how to paint a plastic chair, it’s essential to prepare your plastic chair properly. This stage involves a few important steps to ensure the paint adheres well and provides long-lasting results.
Cleaning the Chair: Start by giving your plastic chair a thorough cleaning to remove any dirt, dust, or grime. Use a mild detergent and warm water to scrub the chair, and rinse it thoroughly to remove any residue.
Sanding the Chair: Next, create a smooth surface for paint adhesion by lightly sanding the entire chair. Use fine-grit sandpaper or a sanding block to gently roughen the surface. This step helps the paint adhere better and reduces the chance of peeling or flaking.
Priming the Chair: To enhance the paint’s adhesion and coverage, apply a plastic primer specifically designed for plastic surfaces. Priming creates a solid foundation for the paint and ensures a smoother and more durable finish. Follow the manufacturer’s instructions for proper application and drying time.
Choosing the Right Paint for Your Plastic Chair
When it comes to selecting the right paint for your plastic chair, several factors come into play. Understanding the different paint types, finishes, and color schemes will help you achieve the desired result.
Understanding Different Paint Types: Two common options for painting plastic chairs are spray paint and brush-on paint. Spray paint provides a quick and even coverage, while brush-on paint offers more control for detailed work.
Selecting the Appropriate Paint Finish: Consider the desired look and level of sheen for your chair. Gloss finishes offer a shiny appearance, satin finishes provide a subtle sheen, and matte finishes offer a non-reflective, flat look.
Considering the Color Scheme: Choose colors that complement your space and enhance the chair’s aesthetic appeal. Consider the overall color scheme and the mood you want to create. Don’t be afraid to get creative and mix different colors for a unique look!
Applying Paint to Your Plastic Chair
Now that your chair is prepped and you have the right paint, it’s time to bring your vision to life. There are different techniques for applying paint to a plastic chair, so choose the one that suits your preferences and desired outcome.
Spray Painting Technique: Spray painting offers quick and even coverage. Start with light, sweeping motions, holding the can about 8-12 inches away from the chair. Apply thin coats to avoid drips or runs, allowing proper drying time between coats.
Brush-on Painting Technique: Brush-on painting provides more control, allowing you to apply paint precisely. Use a high-quality synthetic brush designed for smooth finishes. Apply thin, even coats, brushing in one direction for a cleaner look.
Layering and Drying: Depending on the desired opacity and color intensity, you may need to apply multiple coats. Allow each coat to dry completely before applying the next. Patience is key to achieving a professional and flawless finish.
Adding Finishing Touches and Sealant
Once your chair is painted to perfection, you can take it a step further by adding decorative elements and protecting the paint for long-term durability.
Adding Decorative Elements: Get creative and add personal touches to your chair. Consider using stencils, patterns, or decals to create unique designs. This is your opportunity to let your imagination soar and make your chair truly one-of-a-kind.
Applying a Protective Clear Coat: To shield your painted chair from wear and tear, apply a clear coat or sealer designed for plastic surfaces. This extra layer of protection will help preserve the paint and extend the chair’s lifespan. Follow the manufacturer’s instructions for proper application and drying time.
Finishing Details: Once your chair is completely dry, take a moment to clean up any paint drips or smudges. Inspect the final result and make any necessary touch-ups for a polished and flawless finish.
Maintenance and Care for Your Painted Plastic Chair
To ensure your painted plastic chair remains fresh and vibrant over time, regular maintenance and care are essential.
Cleaning Guidelines: Clean your chair periodically with a mild detergent and warm water. Avoid abrasive cleaners or scrub brushes that could damage the paint. Gently wipe the surface and rinse thoroughly.
Touch-up and Repairs: Despite your best efforts, accidents can happen. If your chair gets chipped or scratched, touch up the affected areas with matching paint. Keep some extra paint on hand for future touch-ups.
Long-term Durability: Protect your painted chair from excessive sun exposure and extreme weather conditions. Consider storing the chair indoors or using a cover when not in use. Proper care and maintenance will help extend the lifespan of your painted plastic chair.
Tips and Tricks For Painting Plastic
Painting plastic furniture can be a fun and rewarding DIY project that allows you to breathe new life into your old or outdated pieces. To ensure a successful and professional-looking result, consider these helpful tips and tricks to paint plastic outdoor furniture:
- Clean and Prep Thoroughly: Properly clean the entire surface before painting. Remove any dirt, dust, mold, mildew or grease using a mild detergent and warm water or hot water (or a mild all purpose cleaner). Make sure you get in all the nooks and crannies. Rinse the furniture thoroughly and allow it to dry completely before painting. Paint outdoors or in a well-ventilated area or garage. Lay down drop cloths to prevent overspray from the paint from getting on the floor.
- Choose the Right Paint: Opt for a high-quality paint specifically formulated for plastic surfaces. Look for paints that offer excellent adhesion and durability. Consider using spray paint for quick and even coverage or brush-on paint for more control over detailed areas. I like Rust-oleum or Krylon spray paint.
- Priming is Key: Priming plastic furniture is crucial for better paint adhesion and long-lasting results. Use a primer specifically designed for plastic surfaces. Apply a thin and even coat of primer, following the manufacturer’s instructions, and allow it to dry completely before painting.
- Sand for Better Adhesion: While plastic furniture doesn’t require heavy sanding, lightly sanding the surface with fine-grit sandpaper can enhance paint adhesion. This step helps create a slightly roughened surface for the paint to grip onto. Try a sanding sponge for light sanding.
- Apply Thin Coats: When painting plastic patio furniture, it’s best to apply thin coats of paint rather than one thick coat. Multiple thin coats allow for better adhesion, smooth coverage, and faster drying. Be patient and allow each coat to dry completely before applying the next.
- Avoid Overlapping Strokes: To achieve a seamless and even finish, avoid overlapping your brush strokes or spray patterns excessively. Keep your strokes or sprays consistent and in one direction for a professional look.
- Use Light Layers for Spray Painting: When using spray paint, apply light and even coats. Start with a light mist and gradually build up the coverage to avoid drips, runs, or uneven patches. Maintain a consistent distance from the furniture as you spray for consistent results.
- Consider a Protective Clear Coat: To prolong the life of your painted plastic lawn chairs, consider applying a clear protective coat. This extra layer of sealant can provide added durability, protect against scratches, and enhance the longevity of your paint job.
- Allow Ample Drying Time: Patience is key when painting plastic furniture. Allow each coat of paint and the final protective coat to dry completely before using or moving the furniture. Rushing the drying process can lead to smudges, fingerprints, or damage to the finish.
- Proper Maintenance: To keep your painted plastic furniture looking its best, follow proper maintenance practices. Clean the furniture regularly with a mild detergent and avoid using abrasive cleaners that could damage the paint. Protect the furniture from excessive sun exposure and harsh weather conditions to prevent fading or deterioration.
With these tips and tricks in mind, you’ll be well-equipped to tackle your plastic furniture painting project and achieve impressive results. Get creative, have fun, and enjoy the process of transforming your furniture into personalized and stylish pieces that breathe new life into your space.
By following this comprehensive guide, you can successfully paint your plastic chair and breathe new life into it. Whether you’re transforming an old chair or adding a personal touch to a new one, this DIY project allows you to unleash your creativity and enjoy a refreshed seating experience. So, gather your supplies, put on your painting clothes, and get ready to embark on a colorful and transformative journey!