 This post was sponsored by Downy Wrinkle Releaser Plus as part of the Mom to Mom Advice campaign with KSW Media, but opinions and content are all my own.
If you’d like to try these products, you can download coupons here.

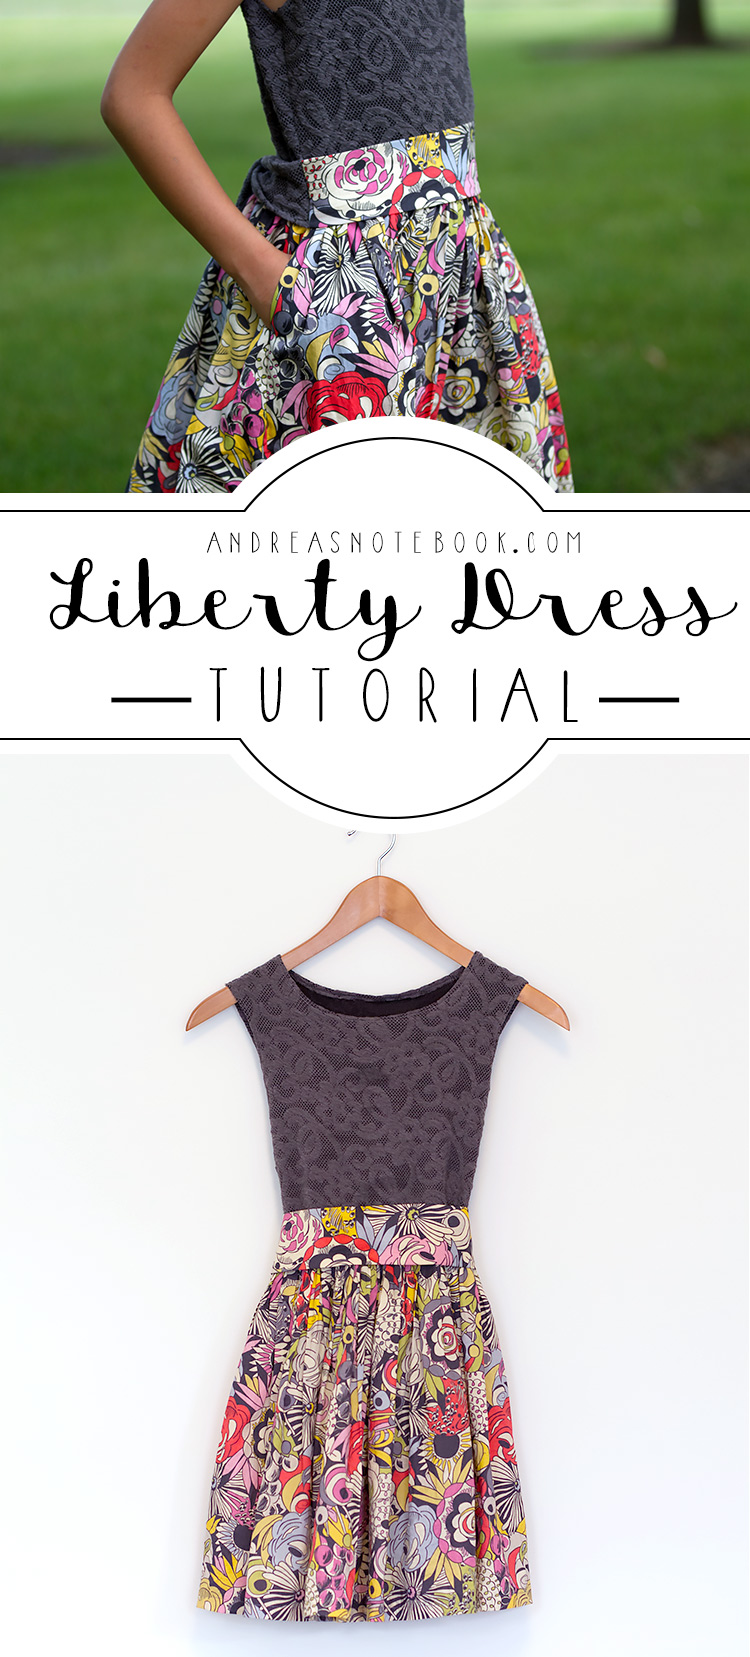
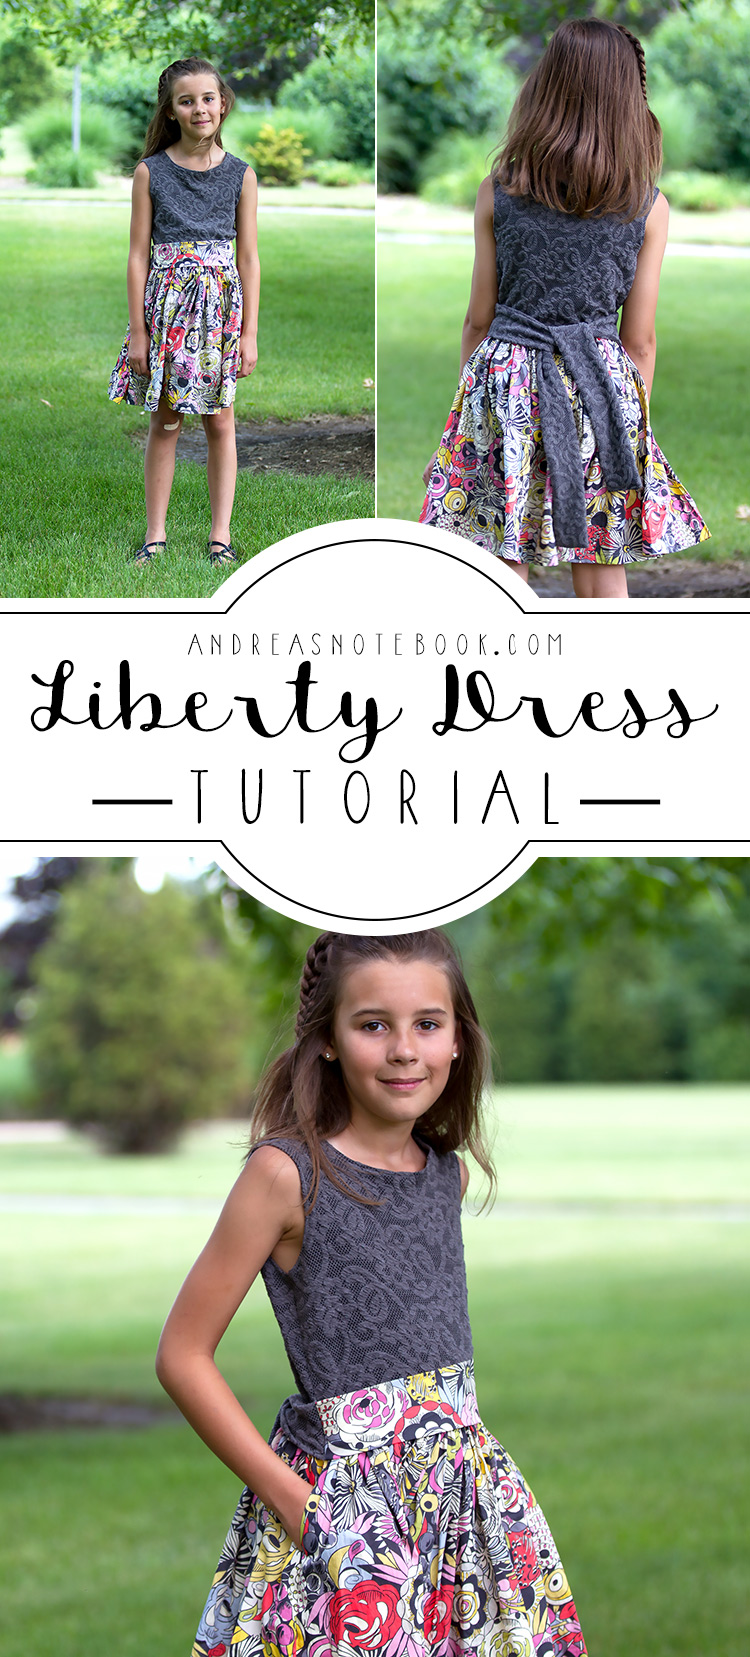
I’ve been hoarding this Liberty of London fabric for a few years. I’ve used bits and pieces for different projects but I’ve had just over a yard folded on my shelves, awaiting the perfect project. My daughters had a piano recital last weekend and my non dress wearing daughter needed a dress. Common sense says never spend time making a dress for a girl who hates dresses. It also says not to use your best fabric on said dress. But I used it on a dress. And the dress is so awesome she fell in love and says she’ll wear it every week.
Do you get how awesome that is? It’s like a kid who hates reading but then finds a book that makes them fall in love with reading. Well, maybe it’s like a kid who hates reading but then finds one book they like. It’s still a win in my book. Do you have a kid like this? I know a lot of you can relate!
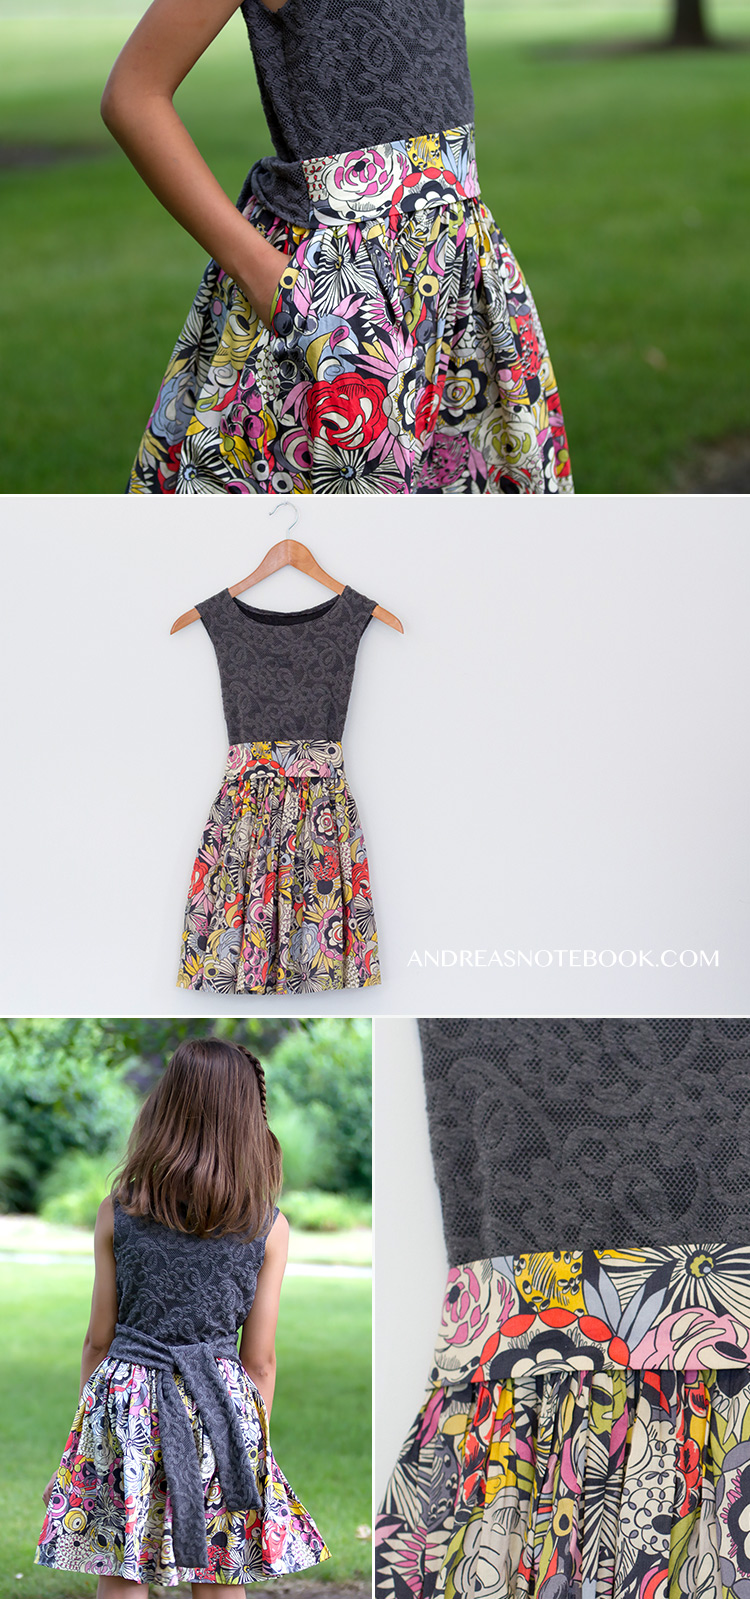
I love the way the fabric moves! Ok, moms, are you ready to make this dress? I guarantee they’ll love this one!
Supplies:
Fabric yardage is for a size 10 girls dress. More or less fabric will be required for other sizes.
- ½ yard of knit fabric- Mine is a decorative ponte from JoAnn Fabric and Crafts.
- 1 yard of woven fabric. I suggest something that drapes well. This Liberty of London is dreamy.
- ¼″ elastic
- Sewing machine
- Knit or ballpoint sewing machine needle for sewing knit fabric.
- Universal sewing machine needle for sewing woven fabric.
- Coordinating thread
- Iron
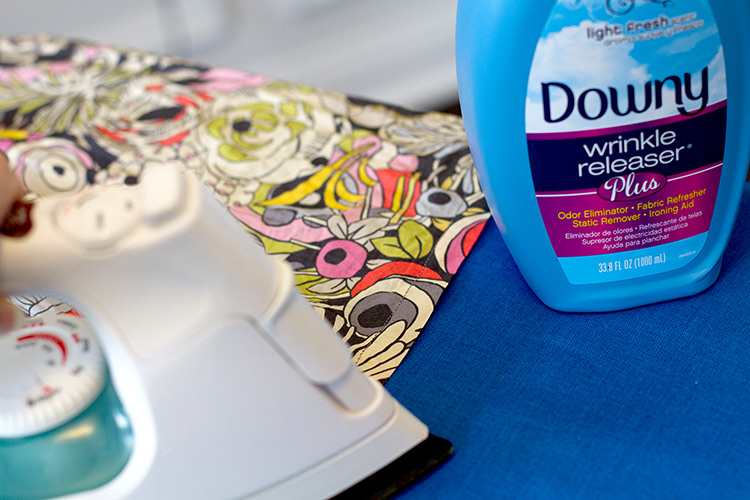
- Wrinkle Releaser Plus (optional)
Note: This dress in the photo has inseam pockets. Follow this tutorial to make your own inseam pockets on any dress or skirt.
Pro Tip:
Always iron your fabric well before, during and after a sewing project! Start with well pressed fabric. I like to use Downy Wrinkle Releaser Plus. If your fabric isn’t too wrinkled, a few sprays of this will be all you need. If your fabric has been folded for a long time, spray with Downy Wrinkle Releaser and then press your fabric. Never underestimate the power of crisp fabric! This wrinkle releaser also gets rid of static and leaves your fabric smelling fresh. I know you’re loving that!
Instructions:
1. Measure the chest, waist and shoulder-to-waist measurement on the model.
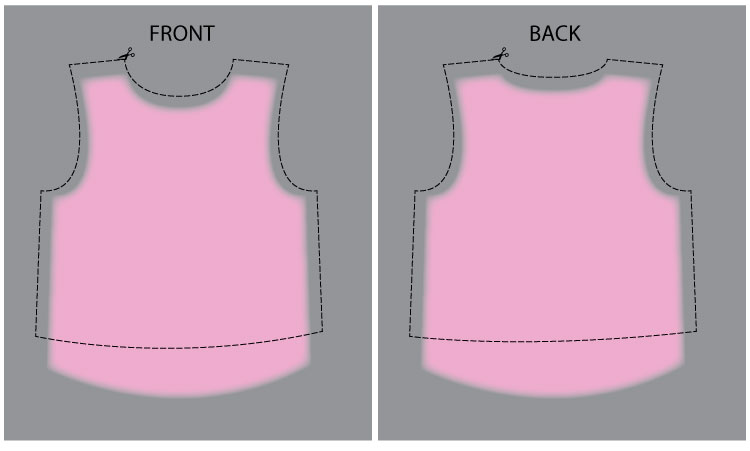
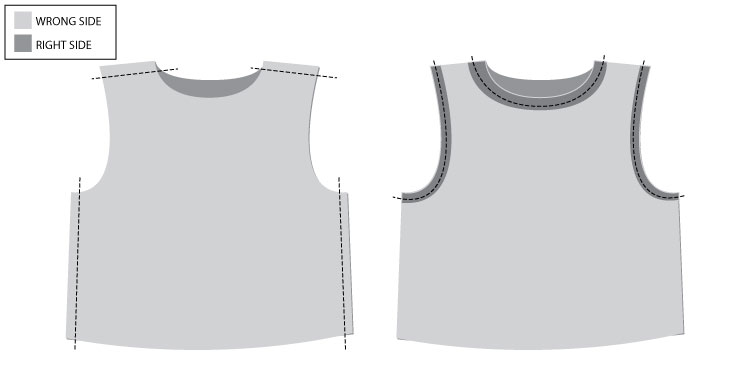
2. Use a well fitting (not too tight or too loose) tank top as a template for the bodice of the dress. Trace around the tank, adding ⅜″ for seam allowances. Measure to make sure the chest, waist and shoulder-to-waist measurements are correct on the traced bodice.
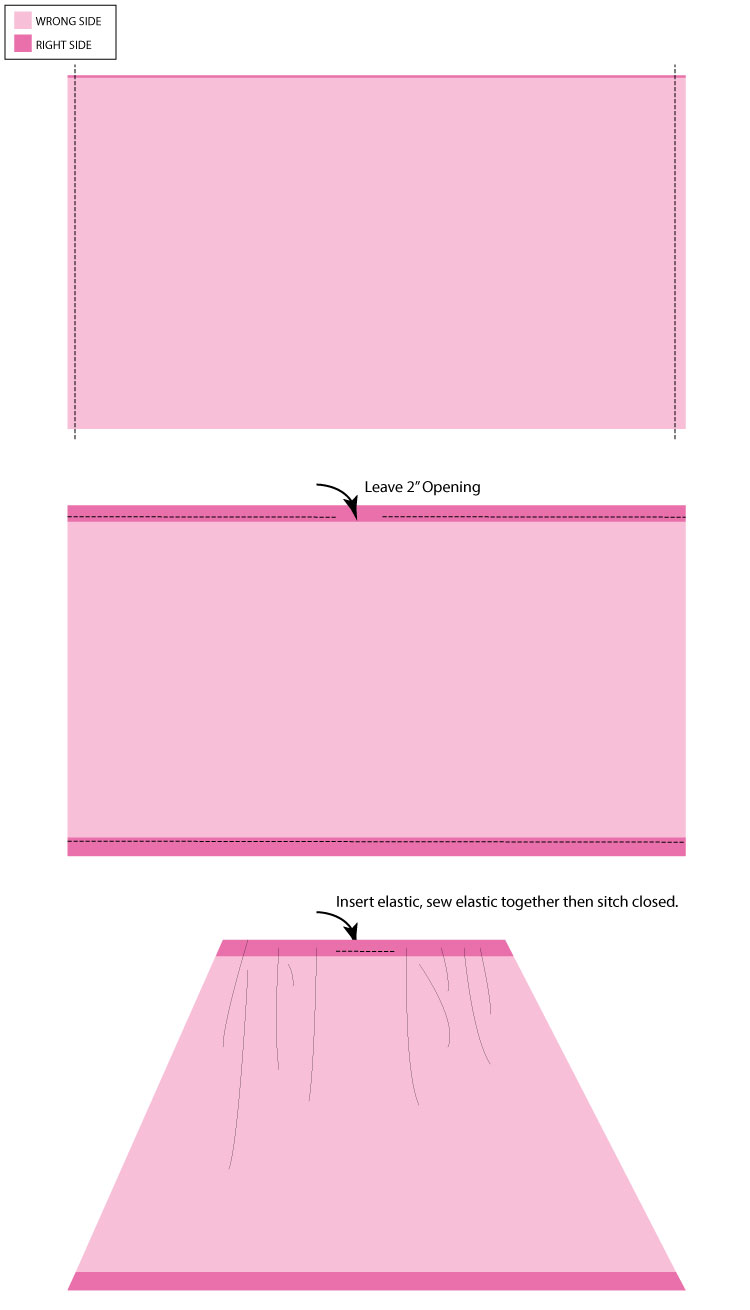
3. Measure from where the bottom of the bodice will lie to the knee. Cut two full width (42″) panels the length of the skirt, plus 2 inches for hems and casing. For my dress I cut 2 rectangles, 42″ x 19″.
4. With bodice front and back right sides together, sew shoulder seams. Then sew side seams. Press your seams every step of the way. A nice dress will become a gorgeous dress once all the seams are pressed.
5. Sew neckline and arm holes. Press neckline and arm holes ⅜″ toward wrong side of bodice. Pin then sew.
6. Sew skirt side seams, right sides together. Press top edge under ¼″ then fold and press under another ½″. Sew down, leaving 2″ opening to insert elastic.
7. Press and sew skirt hem by pressing under ¼″ then pressing under 1″. Sew to complete hem.
8. Cut elastic 1″ shorter than waist measurement. Insert into skirt casing using a safety pin or bodkin.
9. Sew elastic together. Sew casing closed.
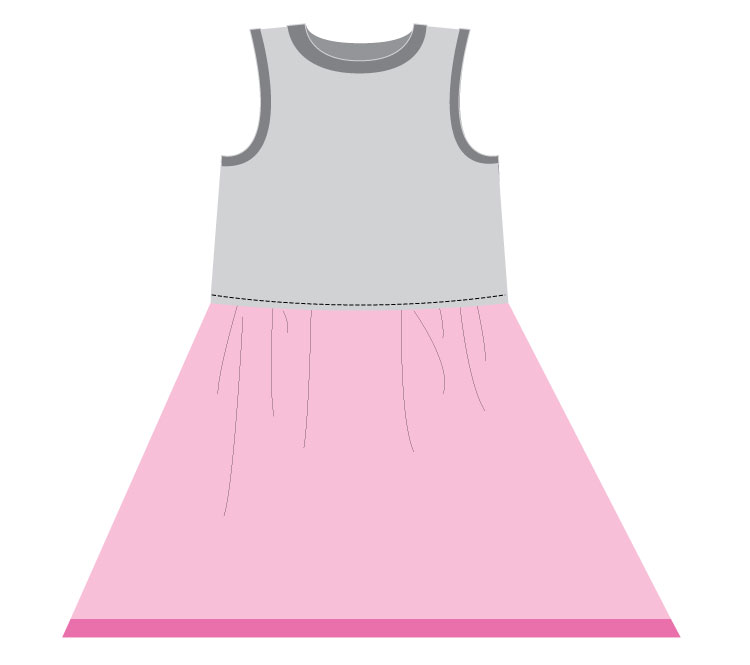
10. With bodice top wrong side out and wrong right side out, overlap skirt casing and the bottom of bodice top. Pin and carefully sew bodice top to skirt (carefully stretching the skirt as you sew). Sewing along the existing casing stitches. Be careful not to sew over elastic. Use lots of pins to ensure this goes smoothly. Please note that there are other ways to construct a dress like this but I think this is the easiest way for novices.
11. If you’d like to make a sash, cut your fabric 6 inches wide by at about 2 times the waist measurement. I used two different fabrics on my sash but you can use just one if you prefer. Use a fusible interfacing on the front of the sash so it stays crisp.
What do you think?? If you make a dress similar to this I’d love to see photos!
This is a sponsored post but all opinions are my own!
Comments & Reviews
Emily says
So beautiful!
Celeste says
I love this dress but did not see where you added the pockets. I love dresses that have these and would love to include them…I’m ready to get started!!
Andrea says
Hi Celeste,
Adding any pockets into a seam is simple. I’ve linked to a tutorial in the post. Hope that helps!
Andrea
Maya says
Hi Andrea !
I love the dress and it is perfect for my girls’ birthdays coming up in a few months.
I was wondering about the sash – Did you sew it to the dress or is it just tied at the back?
If you sewed it – could you please explain at what stage?
Thank you very much !
Maya
Andrea says
Yes, I just tacked it onto the dress after it was complete.
Jane says
What does this mean?
With bodice top wrong side out and wrong right side out. I understand what wrong side out means but what does wrong right side out mean?
Querida says
The fabric is comfortable and suitable for children to wear
leigh stanton says
Is the top a textured knit? where can I find this kind of fabric? It’s just a beautiful dress.