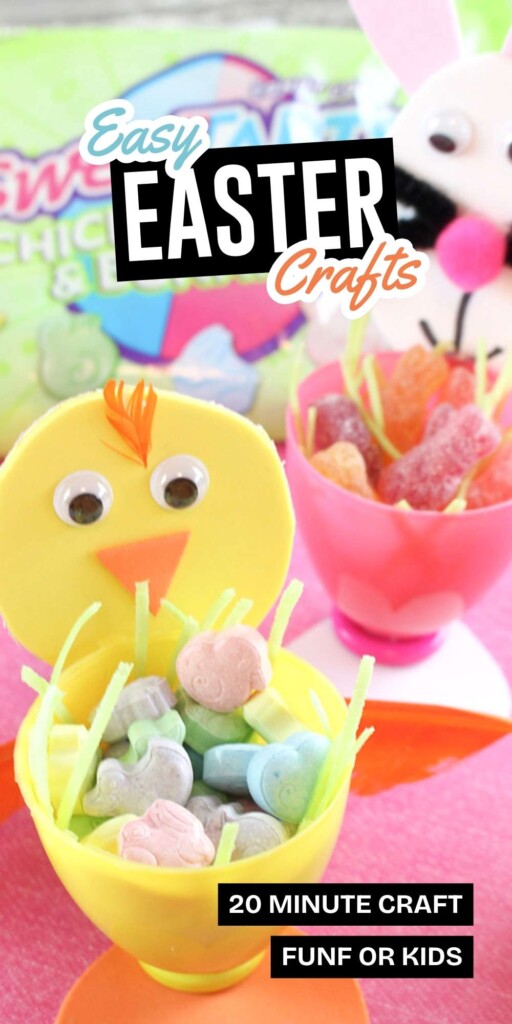
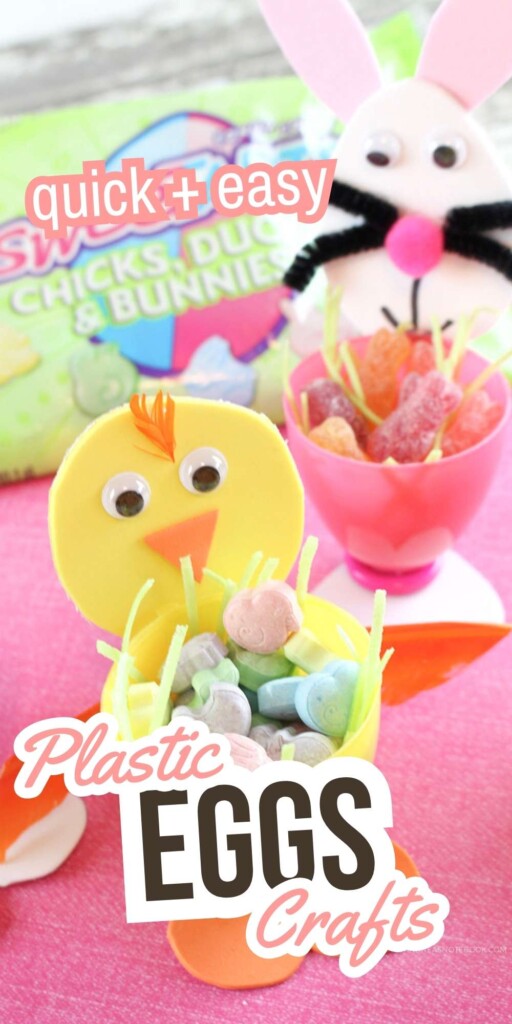

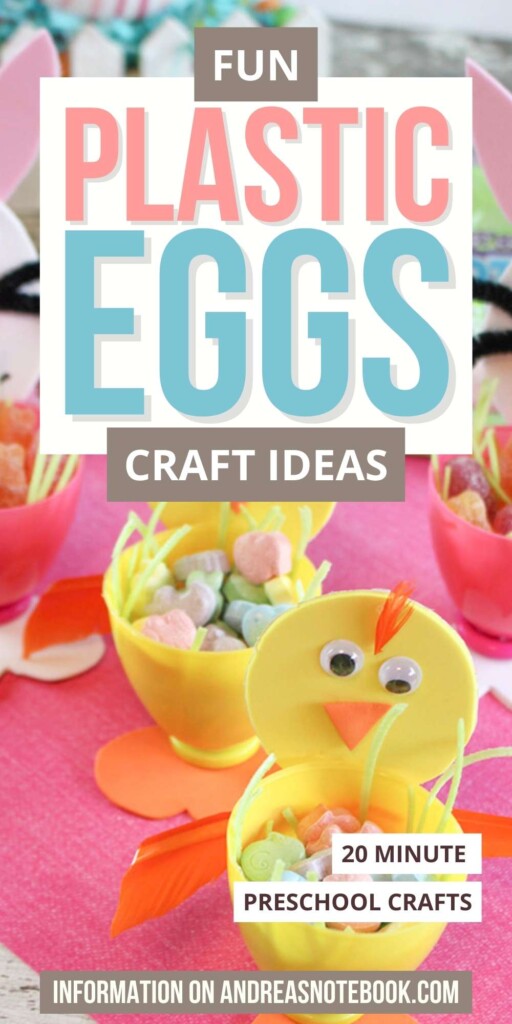
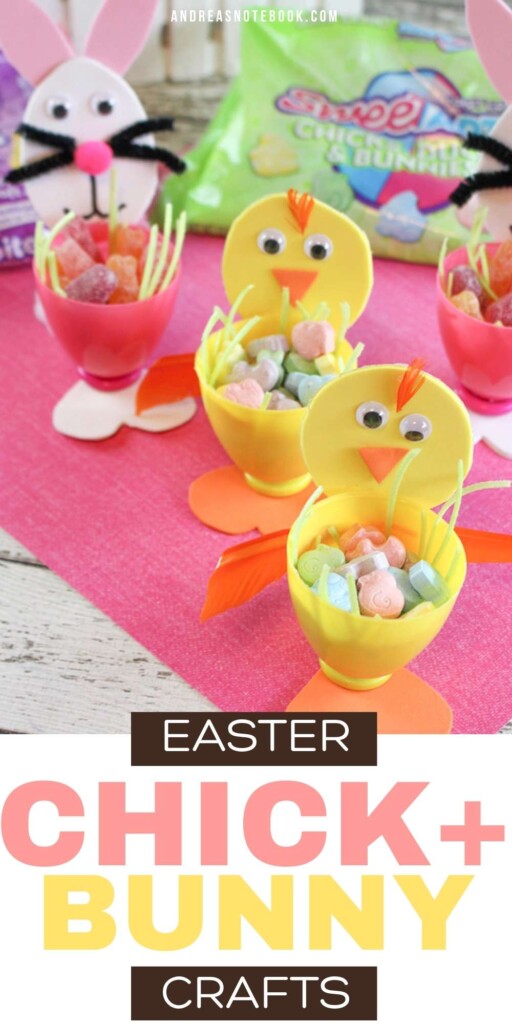
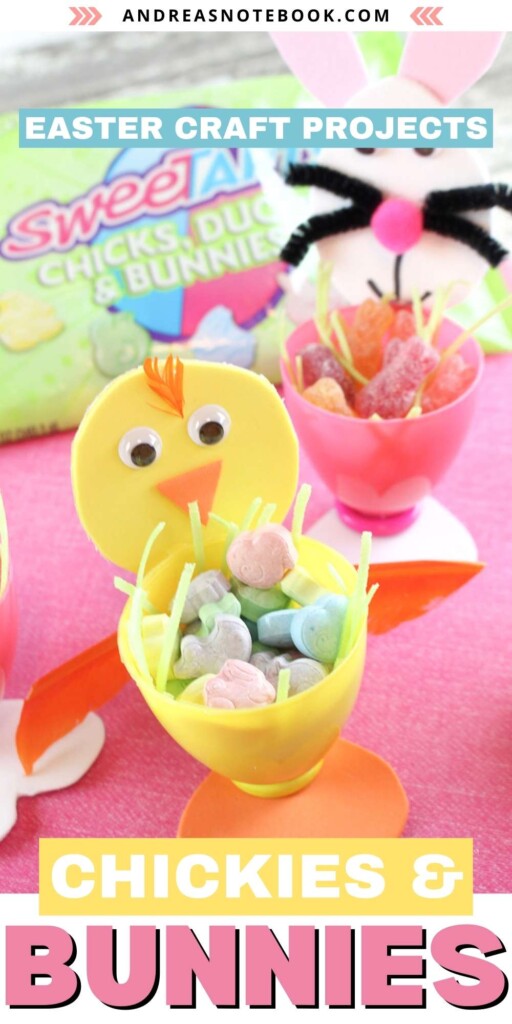

Transform those leftover plastic Easter eggs from your Easter egg hunt into adorable decorations with our plastic Easter egg craft guide. Discover fun ways to turn plastic Easter eggs into cute Easter chicks or Easter bunnies, perfect for kids of all ages. This guide offers creative ways to re-imagine those colorful shells into charming Easter craft ideas. Get ready to craft memorable, smile-inducing pieces that will brighten any corner of your home this spring. Start crafting today and bring a burst of joy to your Easter celebrations.
If you love Easter, don’t miss 26 Non Candy Easter Egg Fillers, 25 Themed Easter Baskets and Free Stuffed Bunny Sewing Pattern.
Plastic Easter egg crafts are fun to do before Easter with younger kids or even after the Easter egg hunt with older kids. You can do Easter crafts after they get their Easter baskets. This simple Easter craft is an easy way to use old plastic Easter eggs and supplies you already have on hand. If you make them with kids you can fill them with some Easter candy and display them as Easter decorations for years to come!
What To Do With Your Plastic Egg Crafts
Transform your DIY plastic Easter egg chick and bunny cups into versatile treasures with these creative ideas:
- Candy dish: Fill these adorable cups with jelly beans or chocolate eggs. They’re perfect for Easter gatherings or as a sweet treat for visitors.
- Plastic Easter egg flower pots: Small succulents or spring flowers fit perfectly. These make for lively home decor or thoughtful gifts.
- Easter egg planters: Teach kids about gardening by planting easy-to-grow seeds. Watch as your mini garden comes to life.
- Easter egg candle holder: Place small electric votive candles inside for a festive glow. Ideal for Easter dinner tablescapes or to add warmth to any room.
- Home decor: Use them as colorful accents around your home. They brighten shelves, mantels, and reading nooks with a touch of spring.
Each idea not only repurposes but the fun project also brings a unique charm to your Easter celebrations.

Supplies
You will need some simple supplies that are available at any craft department, dollar store or craft store. You can also buy all of these things online. Links are affiliate links to Amazon online but get creative and use things you have on hand! No craft foam? Use little bits of cardboard or whatever you want! No feathers? Try using tissue paper or some other craft supply.
- Plastic Easter Eggs: Use your extra plastic Easter eggs to make these fun crafts. Use pink eggs for the bunnies and yellow eggs for the chicks. The jumbo plastic eggs are best.
- Jumbo Buttons: Get jumbo plastic buttons that are the same or similar color to your plastic eggs.
- Foam Sheets: These craft foam sheets are found in the kid crafts aisle. You will need white and pink for the bunnies and yellow and orange for the duckies.
- Small Pom Poms: Little craft pom poms are used as tails for the bunnies and duckies. Get white for bunnies and yellow for ducks. You might want to use different sizes of pom poms for the chicks and bunnies.
- Pipe Cleaners/Chenille Sticks: One black pipe cleaner is used as bunny whiskers.
- Black Marker: This marker is used to draw the bunny mouth. You could also use paint pens.
- Adhesive Googly Eyes: Little googly eyes are used for both animals.
- Feathers: Small pieces of orange feathers or yellow are used as chick feathers.
- Glue: We used glue dots and hot glue. You could use all hot glue in a hot glue gun, if you prefer.
- Scissors: You will need scissors to cut out the foam, chenille sticks and feathers.
Once your supplies are gathered you’re ready to start your plastic easter egg craft! It’s the perfect activity for a crafty morning with kids.
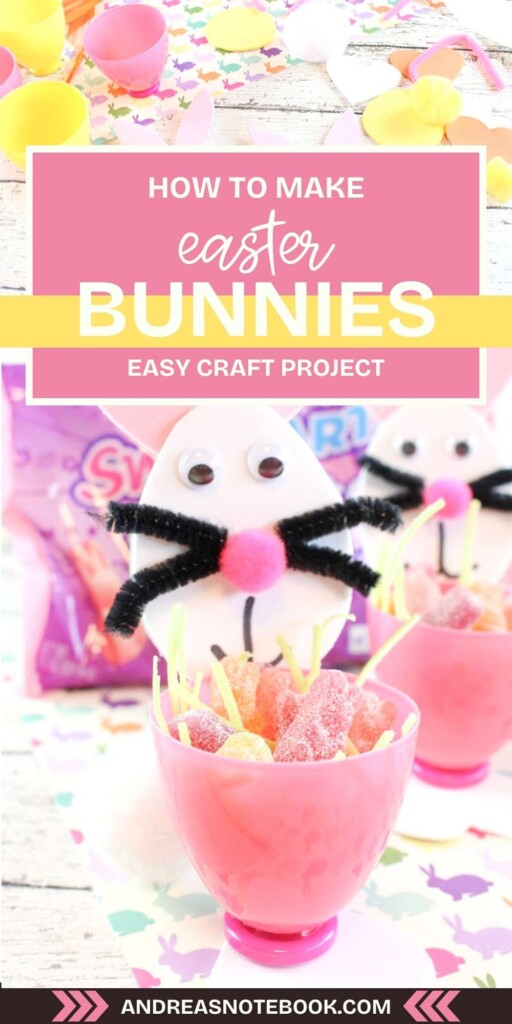
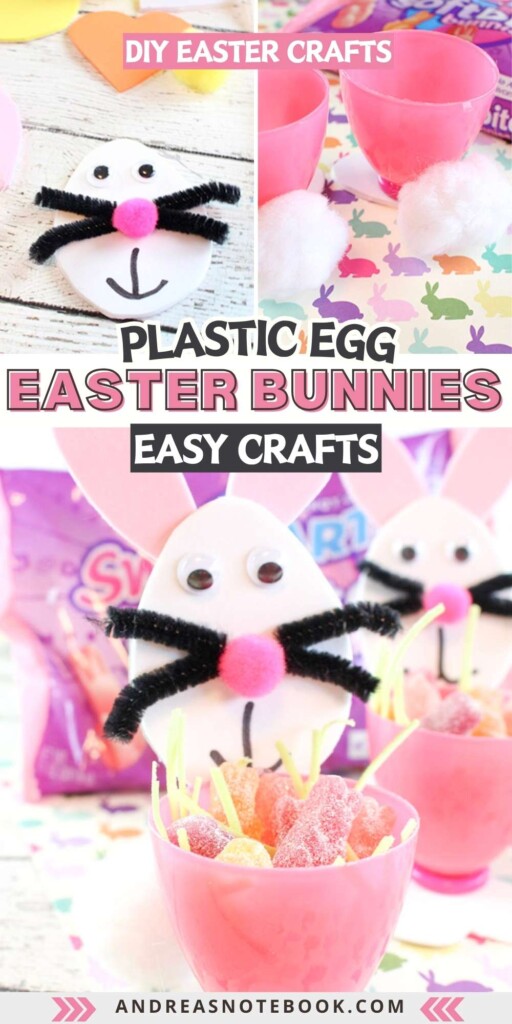
How To Turn A Plastic Easter Egg Into A Bunny
Get started on your easy Easter craft! These are fun ideas for little hands to practice fine motor skills. Always have adult supervision when working with hot glue guns.
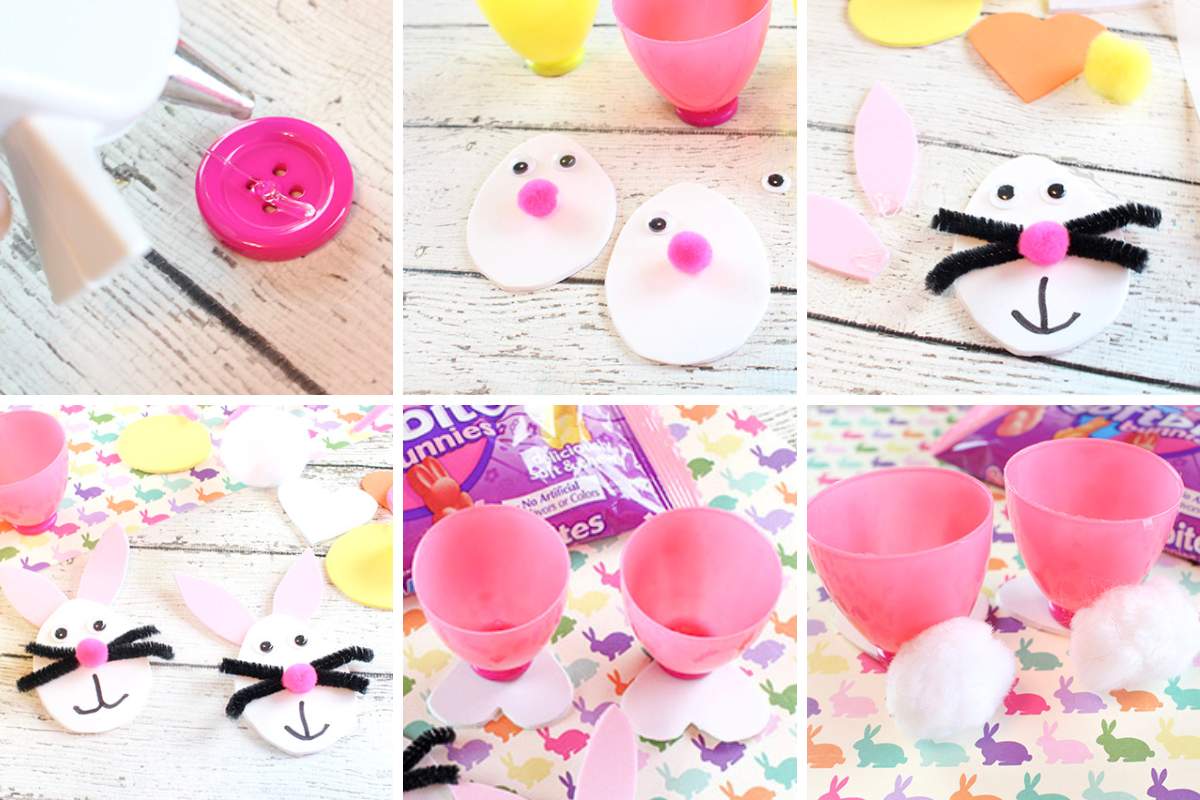
- Apply glue to the middle of each button and place the bottom of the Easter eggs on top, pressing down firmly until secure. Set aside.
- Cut out 2 oval shapes from the white foam paper, approximately 2 ½ inches long. This will be the face of the bunnies. Cut out 2 heart shapes from the white foam board, about 2 inches across and 2 inches long. Apply hot glue to the pointy ends of each heart and lay the eggs on top. (The round parts of the heart will be the feet). Press down firmly and hold for 10-15 seconds. Set aside.
- Add 2 adhesive eyes to each oval shaped face. Apply a glue dot in the middle of the face for the nose. Place a mini pink pom pom onto each glue dot and press down firmly. For the whiskers, use hot glue to attach the pipe cleaner strips (2 on each side of the nose). For the mouth, draw the letter “J” and then a backwards “J” on top. Set aside.
- For the tail, apply hot glue to the back of each egg. Press a medium white pom pom into the glue and hold firmly for 10-15 seconds.
- Cut out 4 bunny ears from the pink foam board, 2 inches long. Attach 2 ears to the back of each face with glue dots.
- Apply hot glue to the very bottom of each face and attach to the back of each pink Easter egg cup. Hold and press firmly for 10-15 seconds.
- Fill with edible Easter grass and your favorite Easter treats.
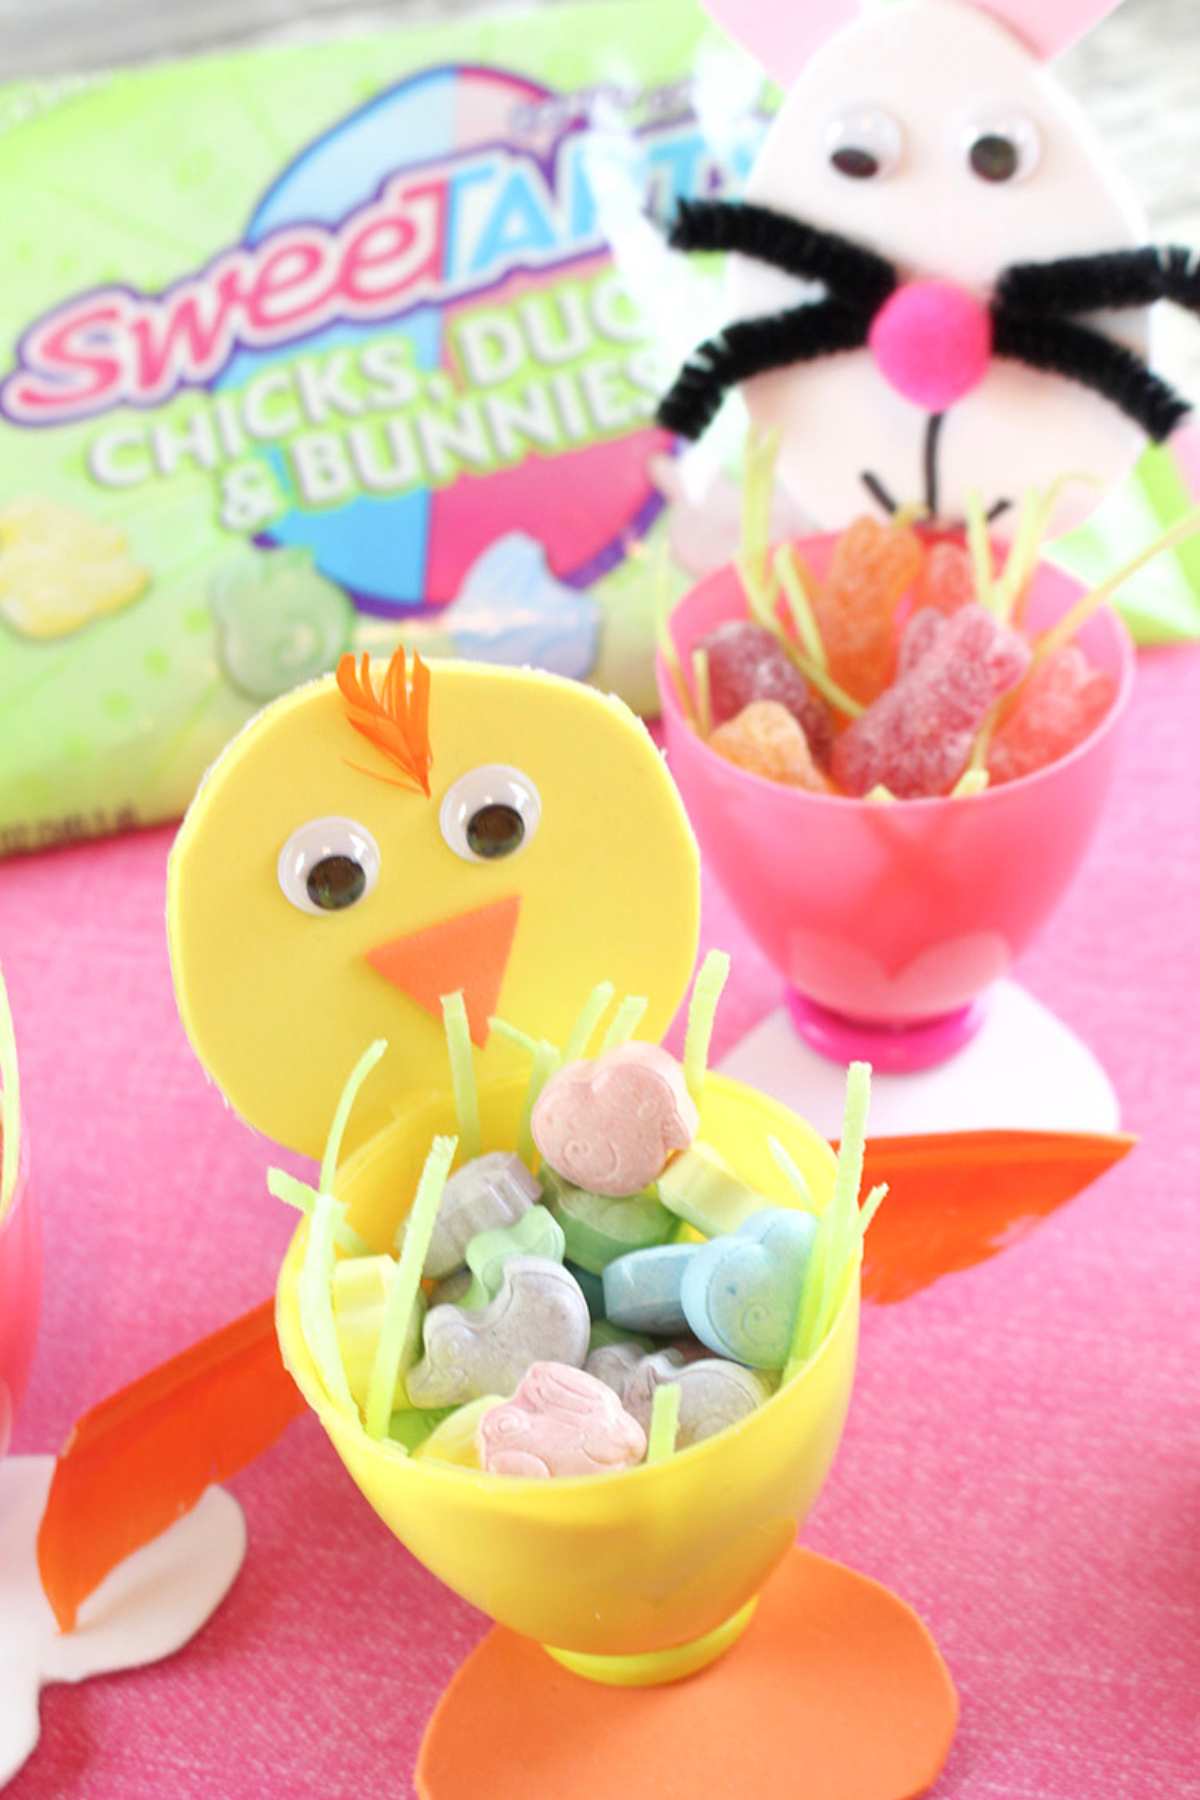
How To Turn A Plastic Easter Egg Into A Chick

- Apply glue to the middle of each yellow button and place the bottom of the Easter eggs on top of the glue, pressing down firmly until secure. Set aside.
- Cut out 2 round shapes from the yellow foam paper, 2 inches in diameter. This will be the face of the chicks.
- Cut out 2 small triangles from the orange foam paper for the beak. Set aside.
- Cut out 2 heart shapes from the orange foam paper, approximately 2 inches across and 2 inches long. Apply hot glue to the bottom of the heart shapes and place the eggs on top. (The round parts of the heart will be the feet). Press down firmly and hold for 10-15 seconds. Set aside.
- Add 2 adhesive eyes to each face. Stick a glue dot in the middle of each chick face and place an orange triangle on top for each beak.
- For the tail, apply hot glue to the back of each egg. Press a medium yellow pom pom into the glue and hold firmly for 10-15 seconds.
- Add a glue dot to the top of each chick head, directly in the middle. Snip off a tiny amount from an orange feather and place on top of each glue dot. With a glue gun, attach 2 orange feathers to the back of each chick.
- Apply hot glue to the very bottom of each face and attach to the back of each yellow Easter egg cup. Hold and press firmly for 10-15 seconds.
- Fill with edible Easter grass and Easter treats. Have a Hoppy Easter!
Comments & Reviews
Fuzzy International LLC says
I am very impressed with your post.Thank you for Sharing!
gmail login says
Very helpful, thank you for condensing it all like this!
black panther watch says
thank you for condensing it all like this
vex 3 says
I think there are many other people who are interested in them just like me! How long does it take to complete this article? I have read through other blogs, but they are cumbersome and confusing. I hope you continue to have such quality articles to share! Good luck!
tiaa cref login says
Good Work
deletebrowsinghistory.net/ says
Thanks for such a nice article and this article is beneficial if you are loving to decorate your house.
hooda math says
I like your site and content. thanks for sharing the information keep updating, looking forward for more posts. Thanks
Sasi Kumar says
Useful post. Thanks for sharing
slither io says
Your article is awesome! How long does it take to complete this article? I have read through other blogs, but they are cumbersome and confusing. I hope you continue to have such quality articles to share with everyone! I believe a lot of people will be surprised to read this article!
vimax bandung says
thanks you
obat kuat says
makasih infonya
happy wheels says
Thanks for your post! I think there are many other people who are interested in them just like me! How long does it take to complete this article? I have read through other blogs, but they are cumbersome and confusing. I hope you continue to have such quality articles to share!
123movies says
This is so great and I absolutely appreciate you sharing your experience.
Susan says
The correct spelling is “seam”.
cara menggugurkan kandungan says
a pride for me to be able to discuss on a quality website because I just learned to make an article on
Buy Real Instagram Followers says
I have read your content this is just superb and amazing.
slope says
Thanks for sharing.I found a lot of interesting information here. A really good post, very thankful and hopeful that you will write many more posts like this one.
Vivek Jazz says
Thank you.
File Extension APK says
Thanks for your post. Very useful.
How to grow business with Instagram marketing says
this is the good website
Why You Have To Buy Instagram Followers cheap says
this is the good website
Why You Have To Buy Instagram Followers cheap says
nice site
driving directions says
I think this is an informative post and it is very useful and knowledgeable. I really enjoyed reading this post. big fan, thank you!
Simone says
Many interesting information I can find what I am very happy.
www.office.com/setup says
Great post! I am actually getting ready to across this information, is very helpful my friend. Also great blog here with all of the valuable information you have. Keep up the good work you are doing here.