I spent a lot of time on Pinterest and google images looking for inspiration for my daughter’s quilt. I never really found what I was envisioning so I created this Gathered Quilt or Duvet Cover. I’ll show you how to make this top with a tutorial and you can quilt it or turn it into a duvet cover if you choose. I actually made it a duvet cover because I thought my daughter would prefer that but I might quilt it down the road. All you need is the ability to sew a straight line and you can make this cover yourself!
I chose some bright quilting cotton fabrics but you could go monochromatic or even use sheets for this. An all white cover would be really cute as well. My daughter just loves, loves color so that is exactly what she got!
Gather your supplies for the top:
- neutral or white thread
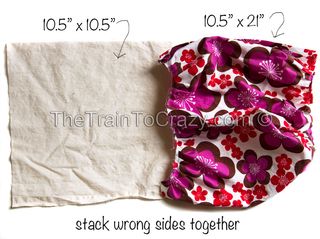
- 63– 21″ x 10.5″ fabric pieces for top (more if you are making this larger than twin)
- 63– 10.5″ x 10.5″ fabric squares in white or unbleached woven fabric for a “backing” piece. I used muslin.
UPDATED: For 63 squares like this one you’ll need 9.25 yards of fabric for the top (assuming 44″ wide fabric). You’ll get 6 cut pieces per yard if you want to think of it that way. I think I used 9 different fabrics. The squares are 10″ square when finished which should help with your math if you are making a different size quilt.
For the backing fabric you’ll need 4.6 yards of 44″ fabric or a full sized flat sheet.
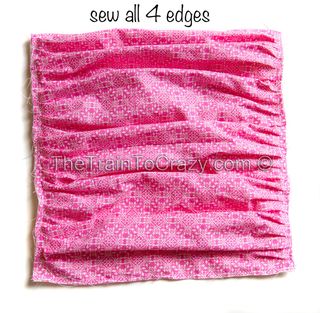
Step 1– Gather long sides of fabric pieces. Use a long stitch or a ruffler foot to make the gathered side 10.5″ long just as the short side. It will be a square.
Step 2– Sew gathered piece to a backing piece to stabilize.
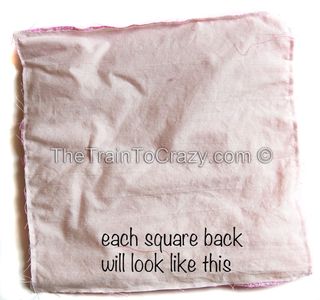
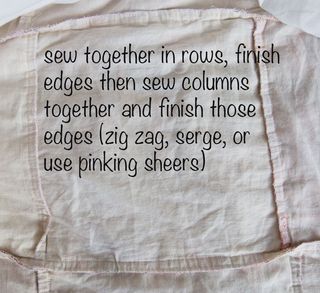
Step 3– Sew squares together! I recommend laying them all out to decide how you want them arranged. I chose to alternate the direction of the gathers to create the look I was going for. Then sew one row together at a time with a ¼″ seam allowance. After the rows are sewn you can finish the edges. I serged mine but you can use a zig zag stitch or pinking sheers if you’d like. This will prevent fraying.
After you have all your rows sewn, sew the rows together. Make sure to pin well and match the corners. Then finish the remaining edges.
Step 4– Make your cover into a Duvet or Quilt! I used a flat sheet and stacked the cover, right sides together and sewed around the edges leaving a 4 foot opening on one end to stuff the duvet inside. Design Sponge has a tutorial for making a duvet cover if you want more instructions. To make a quilt you’ll sandwich the backing piece (the same size as the top), top and cotton quilt batting. Stitch in the ditch (the seam) in a grid to sew the whole thing together. Sew on a binding around the edge. There are tons of quilt tutorials and you tube videos if you need help!
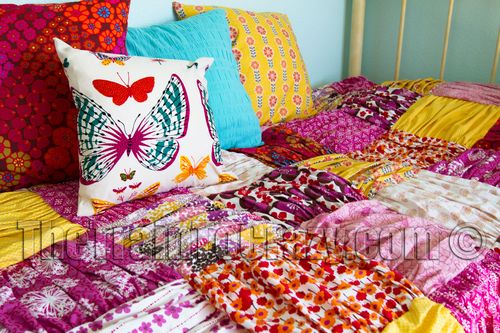
Be warned, this is not a super quick project. It is very easy but takes time!
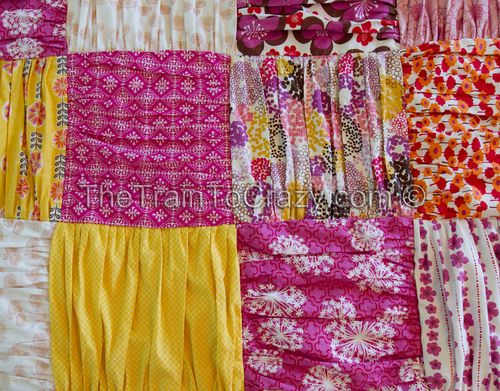

***Edited: You will save a LOT of time buying a ruffler foot for your sewing machine but if you don’t have one you could also save time doing the basting (long) stitch and then pin the top piece to the backing piece THEN pull the thread to gather. I actually don’t love this method but a few people have mentioned they like it.
Comments & Reviews
[email protected] says
I love this. and while I was reading the instructions, I had a brain storm. What if you stuffed each square with batting making it a little pillow, or sewed batting to the lining piece and you would have a quilted (sort of) quilt then just add a back. I think I will have to try this. I have so much fabric I need to do something with.
Heidi K says
I am just curious on the size of this. What does it measure? How many squares did you put in each row? Very cute.
Monica says
Have been looking for the right look for a quilt for my grand daughter…this I think I have enough coordinating fabrics, and this will make it so feminine! Thanks so much for sharing. I will be attempting this soon!
Jennifer says
I absolutely *love* this quilt and hope to make a bigger one for my bed! I was looking on amazon for the ruffler foot and so many of the reviews said to make sure if you wanted a ‘ruffler’ foot or ‘gathering’ foot because they are two different things but sometimes referred to interchangeably. So I guess my question is, am I definitely looking for the ruffler foot or is it a gathering foot that I want?
Andrea @ The Train To Crazy says
Either will work! Have fun!
@pril says
This is really pretty, love it and the idea! I featured this on my blog: http://koolbeenz-blog.blogspot.com/2012/07/featured-quilters-sewers-1-tutorials.html
Feel free to grab my Featured Button if you like.
@pril
KoolBeenz-blog.blogspot.com
For-the-Love-of-Pie.blogspot.com
Jenny says
Andrea, this is beautiful! All the time it took you to make this can be enjoyed for years to come!
Jenny
Seamingly Smitten
http://www.seaminglysmitten.blogspot.com
Jenna says
Do you by chance know the names of the fabrics you used here?
Andrea @ The Train To Crazy says
I know I have them somewhere but give me a few days to find them =)
Dani says
Love this 🙂 I’m thinking about making this, but so that it fits my queen bed! One question: any idea how big your final duvet cover was? Just trying to do the math to see how much more fabric I’ll need to get.
Thanks for sharing!
Andrea @ The Train To Crazy says
Dani,
I can't remember off hand and I can't measure it right now but I know I googled "twin duvet cover dimensions" when making it.
Abbie says
Hi Andrea-
I’m in love with this quilt! If I choose to use a ruffle foot, do you know which size (1, 6, or 12) you had yours on?
Thanks!
Andrea @ The Train To Crazy says
I honestly can't remember. Mine is adjustable. I know I had to adjust the stitch length to make it just right too. My best guess is it was 12 with a 3.0 length stitch.
Laura says
I would also love to know the names of the fabric if you can find them. I absolutely love this creation and the fabrics. Maybe if you don’t know the names you can remember where you bought the fabric.
[email protected] says
Andrea, I just wanted to thank you for the tutorial. I made a duvet cover for my daughter who just went to college. She picked out all the material so it was just exactly what she wanted. It turned out quite well! She loves it and she has something made by me that she touches every day:) Thanks again, Tiffany
[email protected] says
I love this thank u soooo much! I have twin granddaughters cant wait to try and make these for their beds…
Anshu says
This is such an eye candy. I featured it here:
http://sewprettysewfree.blogspot.com/2013/03/gathered-blocks-quilt-tutorial.html
Anshu
http://sewprettysewfree.blogspot.com
jenxo says
I just love this quilt and have just started one myself… a friend showed me a really easy way to gather by zigzagging over some thick thread just inside the stitch line…..all you need to do is anchor one end around a pin and pull other…when you stitch squares together , you stitch just under thread….. perfect gathers and so quick…..saved me heaps of time….hope mine turns a nicely as yours
K-Made-It says
Thank you so much for this tutorial. I’ve just finished a quilt for my daughter that was heavily inspired by yours. It turned out wonderfully. See mine at http://k-made-it.blogspot.com.au/2013/06/ruffle-quilt-finished.html
Linda Norman says
What about using fabric from your little girl’s DRESSES she’s outgrown? She would have those memories forever – if you didn’t have enough, substitute other fabric pieces – but actually using fabrics she recognizes would make this project so special!
Dianna says
If the quilt top is 70 x 90, why do you need a full sized sheet for the backing
Andrea @ The Train To Crazy says
A twin sheet is 66" wide. You may use one and trim the sides of the top if you prefer.
Cheryl says
Loved the colors and the design of it. Also how the room is staged.
Lianna says
I like this blog.