• Home
  • About
  • Sewing Patterns
  • Submit A Project
    • Bloglovin
    • Facebook
    • Google+
    • Instagram
    • Pinterest
    • Twitter
    • YouTube

Andrea's Notebook

The best DIY & sewing tips!

  • Make
    • Art
    • Crafts
    • DIY
    • Fashion
    • Fiber Arts (knit/crochet)
    • Gifts
    • Jewelry
    • Paper Craft
    • Pet Crafts
    • Party
    • Photography
    • Sewing
    • Wood Working
  • Food
    • Breakfast
    • Dinner
    • Healthy Recipes
    • One Pot Meals
    • Side Dish
    • Smoothies
  • Health
    • Fitness
    • Healthy Eating
  • Kids
    • Books
    • Kid Fashion
    • Parenting
  • Living
    • Cleaning
    • Home Decor
    • Humor
    • Inspiration
    • Interviews
    • Organize
    • Positive
  • Sewing
    • Baby
    • Books
    • Boys
    • Dogs
    • Gifts
    • Girls
    • Kids
    • Free Children’s Patterns
    • Free Women’s Patterns
    • Tips & Tricks
    • Men
    • Women
  • Travel
    • Travel – Caribbean
    • Travel – South America
    • Travel – United States
    • Family Travel
    • Travel Tips
  • Community
    • Art
    • Beauty
    • Celebrations
    • Crafts
    • DIY
    • Fiber Arts
    • Kid Crafts
    • Recipes
    • Sewing

All posts may contain affiliate links

Handmade Costumes: DIY Rain Cloud Tutorial

September 13, 2012 by Andrea 25 Comments

Hello!! I’m Cherie from you & mie and I looooooooove handmade costumes! So when Andrea was looking for people to share a costume tutorial, I could not resist! Over the last several years I’ve made quite a few costumes including a Totoro costume for my daughter (it was a big hit!) and several others you can see here, including Russell from the movie, Up. But I’m a total procrastinator and also super indecisive, so I haven’t even started figuring out what my daughter, Yuki, will be for Halloween this year. So in the meantime, I thought I’d whip up a simple costume using only materials I already had a home.

The Rain Cloud costume!


My daughter was feeling under the weather (hah!), so we only snapped a few (mostly unhappy) pictures. But the costume is pretty simple and very comfy. So let’s get started. Here’s what you’ll need.
For the pants:
– Pants or leggings in a “sky” color (blue, gray, white)
– Fabric paint
– Contact paper (or freezer paper)
For the cloud:
– White fabric (cotton, fleece, a white sheet, anything will do! I used fleece and gauze because that is what I had at home)
– Ribbon (for the shoulder straps)
– Fiberfill
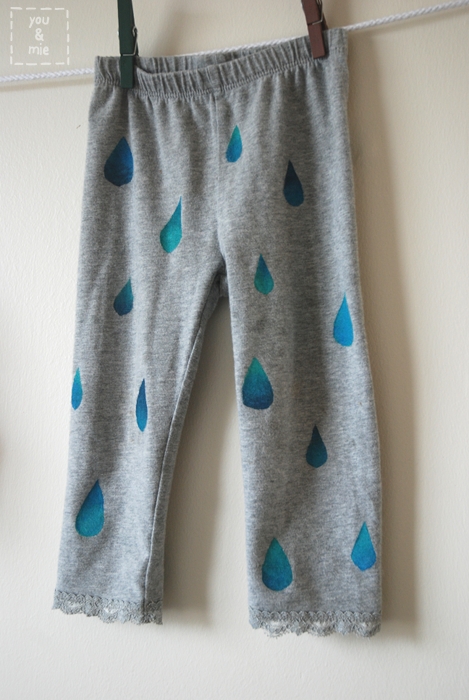
The part of this project that took the longest was waiting for the fabric paint to dry on the pants, so I would start there. Make rain drop stencils and stick them to your pants. Use fabric paint to fill in your stencils (be sure to read and follow all the directions on the paint that you use). I made 3 shades of blue and used two for each rain drop for a kinda gradient/ombre look.

I painted the pants in 3 stages – first the front of the pants, then when that was pretty dry, I removed the contact paper stencil and flipped it over and painted the back. Then I split the pant legs open and painted a few more drops down the outside of the legs.
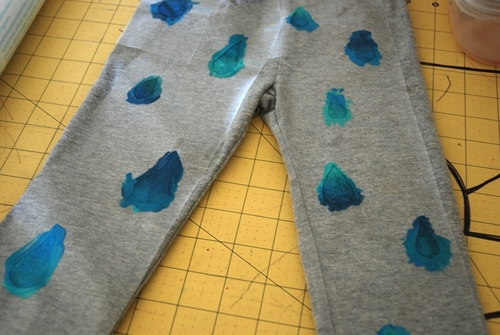
After the paint is almost completely dry, I hung them up to finish drying completely over night. And those are da-DONE!
In between the stages of painting and drying, you can work on your cloud.

First, use a shirt to draw out a cloud pattern. You’ll want the sides of the cloud to extend past the edges of the shirt (we’ll connect them later), but the pattern shouldn’t go past the shoulder to restrict arm movement. Add seam allowance.
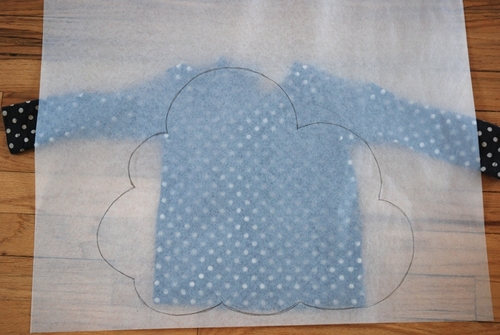
Cut out 4 layers of the cloud pattern. I used fleece for the inside of the costume and gauze for the outside, so 2 clouds of each fabric.

Cut 2 pieces of ribbon for the straps. Lay the inner fabric right side up, then the ribbons right side up.

Lay the outer layer right side DOWN, being sure to tuck all the ribbon inside the cloud. Pin the layers together.

When you sew the back of the costume, be sure that you flip the direction of the pattern.

Sew around the cloud leaving an opening in the bottom. Snip each point close to the seam.

Turn it right side out and press. Fill with a thin layer of batting or fiberfill.
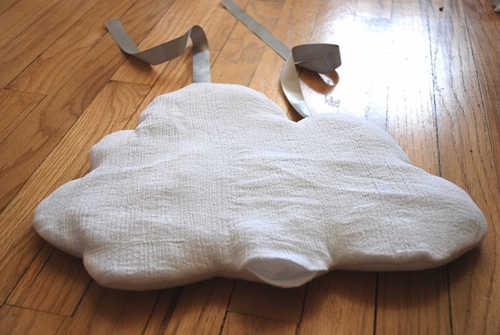
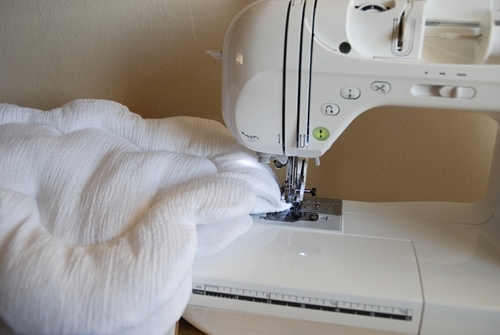
Hand sew the opening shut. Quilt the cloud however you like to hold the filling in its place.

Stack the clouds right sides out and sew the edges together.
Try it on your model and mark how long you need the straps to be. Trim your ribbon, fold the edge under and sew it to the back of the cloud.

Done!

Pair it with some rain boots if you got ’em!

Or regular sneakers to show off all those hand painted drops!

Yuki actually has a pair of rainbow striped pajama pants that would give this outfit a totally different look! So feel free to get creative.

Thanks for having me, Andrea! I’m loving all the handmade inspiration in this series and feel lucky to have been a part of it!


Filed Under: ALL, DIY, handmade dress up series, Sewing for kids, Tutorials Tagged With: costume, DIY, rain cloud, tutorial

About Andrea

Andrea is a mom to four and the creator of both Andrea's Notebook and Sewtorial. In her spare time she designs sewing patterns for Go To Patterns and surfs the web for interesting articles to post on The Train To Crazy.

« DIY Rapunzel Dress Tutorial
DIY Elephant Costume Tutorial (includes tusks!) »

Comments

  1. Jane@Buzzmills says

    September 13, 2012 at 7:05 am

    This is so cute!!

    Reply
  2. RaeAnna says

    September 13, 2012 at 7:27 am

    That is sooooo cute!!! Love it!

    Reply
  3. Jenni says

    September 13, 2012 at 8:07 am

    So cute and relatively simple. I like how quilting the cloud gives it a little more definition. Thanks for sharing!

    Reply
  4. Vanessa@DesignsBySessa says

    September 13, 2012 at 8:55 am

    ADORABLE!!!!!

    Reply
  5. Jenny says

    September 13, 2012 at 11:17 am

    That is adorable!

    Reply
  6. gail says

    September 13, 2012 at 12:15 pm

    soooo cute, i can’t stand it! i want to make one!!

    Reply
  7. Jessica says

    September 13, 2012 at 12:39 pm

    I’m dying. The rain boots are such a nice touch. I love that little raincloud! Bravo Cherie!!!!

    Reply
  8. Cherie says

    September 13, 2012 at 12:40 pm

    Thanks for having me, Andrea!! This series is so much fun!

    Reply
  9. Erin says

    September 13, 2012 at 3:00 pm

    I loooove it!!!!

    Reply
  10. kristin says

    September 14, 2012 at 12:43 am

    cherie is such an amazing costume-maker! LOVE this! perfect for the rainy pacific northwest, too. 😉

    Reply
  11. shannon says

    September 15, 2012 at 11:11 pm

    my wheels are turning into how i can translate that into an everyday outfit! it’s sooo sweet! 😉

    Reply
  12. kids t-shirts says

    September 16, 2012 at 3:07 am

    She obviously loves her cloud rain costume, I couldn’t blame her for that since I like it so much too. Your costume ideas are simple yet unique.

    Reply
  13. Delia says

    September 18, 2012 at 2:07 am

    I seriously love this with my whole heart. What a creative idea!

    Reply
  14. Miranda says

    September 18, 2012 at 1:08 pm

    Completely adorable.

    Reply
  15. rachel says

    September 23, 2012 at 9:28 pm

    oh man this is cute! and so clever, too!

    Reply
  16. leeanna says

    September 25, 2012 at 1:42 pm

    I love how simple this project is. The look is so worth the effort. Good job. 🙂

    Reply
  17. Colleen P says

    October 8, 2012 at 1:55 pm

    Sweet! Her smiling face made my day!

    Reply
  18. sprit says

    October 23, 2012 at 12:48 pm

    j’adore ce petit nuage !

    Reply
  19. Léontine says

    November 10, 2012 at 12:08 am

    I just love it, this little girl is just marvelous dressed like that ! just great, i’d love to be 4 years old.
    Super
    Léontine

    Reply
  20. lestresorsdemilie says

    January 29, 2013 at 8:47 am

    very beautiful

    Reply
  21. rie says

    March 13, 2013 at 10:50 pm

    trop mignon!!! ca donne envie de faire la version soleil aussi….

    Reply
  22. Adrianne says

    October 3, 2013 at 1:33 pm

    This is completely darling. Would you be willing to give me some tips on how you quilted the detail? I haven’t done a quilting stitch before. Thanks so much! I can’t wait to make this for my little guy this Halloween!

    Reply
  23. Maria says

    October 31, 2013 at 1:25 pm

    This costume is SO adorable! Thanks so much for the inspiration. I made it for my 2yr old son -you can see my photos here: http://www.backinthehills.com/1/post/2013/10/rainbow-raincloud.html

    Reply
  24. Domi says

    December 2, 2013 at 3:10 am

    This is soooooo adorable I have to made it for my little girl. Thank you for the inspiration.
    http://lookingmypath.tumblr.com/

    Reply

Leave a Reply to Miranda Cancel reply

Your email address will not be published. Required fields are marked *

Today’s Most Read Posts

Spring Cleaning Tips and Tricks

Posts You’ll Love

  • Bloglovin
  • Facebook
  • Google+
  • Instagram
  • Pinterest
  • Twitter
  • YouTube
  • about
  • sponsorship opportunities
  • become a contributor
  • privacy policy
  • Facebook
  • Google+
  • Instagram
  • Pinterest
  • RSS
  • Twitter

Copyright © 2019 · Andreas Notebook · Design & Development by Shay Bocks